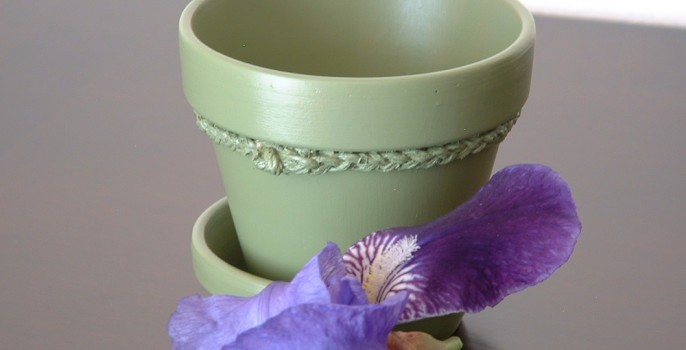
Springtime brings flowers and warm weather to tempt you into the outdoors. Learn how to make a personalized pot for Spring flowers with just a few inexpensive supplies. This simple and classy pot can dress up a gift or decorate a venue without putting a dent in your wallet. Give it as a gift for mom this Mother’s Day, decorate your next barbeque or make one for your very own! These little pots aren’t just for flowers, either – throw some candy in it as a cute serving dish, or put citronella in it for an outdoor candle.
Supplies needed:
- 3″ ceramic flower pot, with base
- Hemp cord
- Indoor/Outdoor paint – I used Patio Paint
- Foam paint brush
- Scissors
- Glue gun
- Ruler or measuring tape
Instructions:
Step 1
Measure and cut 6 pieces of hemp cord 18″ in length.

Step 2
Bundle the 6 pieces of cord together.

Step 3
Wrap around your index and middle finger making a loop.

Step 4
Tie knot by bringing cords through loop and pulling tight.

Step 5
Separate strands of cord and group into three pairs.

Step 6
Braid cord by bringing the two strands of cord from your left hand over the two middle strands.

Step 7
Then take the two strands of cord in your right hand and bring them over the two middle strands.
 Repeat steps 6 and 7 until you have 2″ of cord remaining.
Tie a knot, just as you did in steps 3 and 4.
Cut off excess cord from knot.
Step 8
Now it is time to glue your braided cord to the flower pot, just under the rim. Start by heating up your glue gun. Place your braided cord just underneath the rim. Place a dab of glue on the pot and attach the braided cord making sure you leave 1′ from the knot unglued.

Continue gluing cord to pot with hot glue. I find that doing about an inch at a time works well. If the glue hardens before you are able to attach the cord, you will need to add more hot glue.

Step 9
Continue gluing and attaching until you are about 1″ from the knot.
Step 10
Cut braided cord making sure that you have just enough to slide under the knot. Attach cut braided end to pot then glue knot end of cord on top of braided cord.

Step 11
Paint inside of pot making sure you do not leave air bubbles. A light coat works best, as you will need to do a second coat.


Step 12
Now paint the outside of the pot.

Make sure you cover the cord completely by pressing the foam brush into the cord.
Avoid putting too much paint on your brush during this process.
Allow first coat of paint to dry completely.
Step 13
Paint second coat and allow to dry completely.

Now your pot is ready to accept a pretty potted flower.

For Mother’s Day:

Mom not a fan of watering? Fill the pot with her favorite chocolates or other candies. Don’t forget the card!


4 Responses
Leave a Reply
« Undiscovered Treasures: The Grocery Store Etsy Evolution: From Handmade to FarmVille »
Adorable! Looks like something I saw on Martha Stewarts website. Very classy!!!
Beautiful! The pot has personality now!
really cute, wonderful idea
Love your braided flower pots! Cute idea with so many different uses!!